 This post was last updated 13 years 22 days ago, some of the information contained here may no longer be actual and any referenced software versions may have been updated!
The AddThis Toolbar is a Social Media Marketing tool that “helps website publishers and bloggers spread their content across the web by making it easy for visitors to bookmark and share content to their favorite social destinations. AddThis offers sophisticated analytics to help users understand how and where their content is being shared.”
Add This is a useful addition to our Magento product Social Media Marketing tools which already include Twitter product marketing tweets and the Facebook Like Button and will add another 300 or more Social Networking services available for content sharing and marketing.
Add This functionality is easy to integrate into the product pages of a Magento 1.3.x, 1.4.x or 1.5.x eCommerce store. First you need to sign up for an AddThis account, creating an account will give you access to detailed analytic reports so you can see how your customers are sharing your product information across various Social Networking platforms and destination. Sign up for an account here:
http://www.addthis.com/register
Connect to your Magento site and navigate to the template/page/html folder in your Magento theme and open head.phtml for editing.
For Magento 1.3.x with the Yoast canonical URL extension installed paste the following code at the end of the file. See this post for more details on installing the Yoast extension.
<?php if (Mage::registry('current_product')) : ?>
<script type="text/javascript" src="https://s7.addthis.com/js/250/addthis_widget.js#username=YOUR-ADDTHIS-USERNAME"></script>
<script type="text/javascript">
function addThis(){
        return '<div id="addthis_product_toolbar" class="addthis_toolbox addthis_default_style " addthis:url="<?php echo str_replace($this->getBaseUrl(),"http://YOUR-DOMAIN-NAME/",$this->_data['urlKey']) ?>" addthis:title="<?php echo trim(Mage::registry('current_product')->getName())?>" addthis:description="<?php echo strip_tags(str_replace("<br />",", ",substr(Mage::registry('current_product')->getDescription(), 0, strpos(Mage::registry('current_product')->getDescription(), '.')+1))) ?>">';
    }

var addthis_config = {
        services_exclude: 'facebook',
		data_ga_property: 'YOUR-GOOGLE-ANALYTICS-UA-ID',
		data_track_clickback: true

}
</script>
<?php endif; ?>
For Magento 1.4.x and 1.5.x with canonical URLs enabled paste the following code at the end of the file.
<?php if (Mage::registry('current_product')) : ?>
<script type="text/javascript" src="https://s7.addthis.com/js/250/addthis_widget.js#username=YOUR-ADDTHIS-USERNAME"></script>
<script type="text/javascript">
function addThis(){
        return '<div id="addthis_product_toolbar" class="addthis_toolbox addthis_default_style " addthis:url="<?php echo str_replace($this->getBaseUrl(),"http://YOUR-DOMAIN-NAME/",trim(Mage::registry('current_product')->getProductUrl())) ?>" addthis:title="<?php echo trim(Mage::registry('current_product')->getName())?>" addthis:description="<?php echo strip_tags(str_replace("<br />",", ",substr(Mage::registry('current_product')->getDescription(), 0, strpos(Mage::registry('current_product')->getDescription(), '.')+1))) ?>">';
    }

var addthis_config = {
        services_exclude: 'facebook',
		data_ga_property: 'YOUR-GOOGLE-ANALYTICS-UA-ID',
		data_track_clickback: true

}
</script>
<?php endif; ?>
The code checks first that the page is a product page and then links to the AddThis Javascript code and creates a funtion containing our AddThis HTML elements and configuration data. Add your AddThis username, your domain name and your Google Anayltics ID (if you have one) and save the file. Note that I’m assuming you already have a Facebook Like button so we tell AddThis to exclude Facebook from the list of Social Networking sites available so that its not displayed twice on your product page.
To add the AddThis toolbar to our product pages we need to locate view.phtml in the /template/catalog/product folder of our theme. Open view.phtml and look for the element or div that renders the product-name, around about line 50. If you have implemented my Facebook Like Button solution, the Like Button code will be here, the AddThis toolbar can sit nicely underneath the Like Button. You can also move the code or style the toolbar to appear wherever you like on your product page.
Paste the following code in to view.phtml and save the file.
<!-- AddThis Product Toolbar BEGIN -->
<script type="text/javascript">
document.write(addThis());
</script>
<a class="addthis_button_preferred_1"></a>
<a class="addthis_button_preferred_2"></a>
<a class="addthis_button_preferred_3"></a>
<a class="addthis_button_preferred_4"></a>
<a class="addthis_button_compact"></a>
</div>
<!-- AddThis Product Toolbar END -->
Refresh a product page to see the new AddThis toolbar.

If it looks a bit cramped under the Like Button add a CSS style to your themes stylesheet to move the toolbar down a little.
/*Add This tool bar*/
#addthis_product_toolbar {
padding-top: 5px;
}
The AddThis service dynamically creates the list of available Social Network services based on the information gleaned from the user, browser language etc. If you like you can override the services on the Toolbar, see the Add This site for further details. Test the services to your product details are being sent to AddThis correctly.
There are a variety of toolbars available:

You can find the code to change how the toolbar looks here http://www.addthis.com/web-button-select.
There are also various configuration options availabe for AddThis, for example if you want to specifiy language for a specific store or the bit.ly account to use for short URLs use the following code to extend the Javascript addThis configuration variables.
		<?php if (Mage::app()->getStore()->getId()==1): ?>
		ui_language: 'de',
		<?php endif ?>
		url_transforms : {
			shorten: {
				twitter: 'bitly'
			}
		},
		shorteners : {
			bitly : {
			login: 'YOUR-BITLY-USERNAME',
			apiKey: 'YOUR-BITLY-API-KEY'
			}
		}
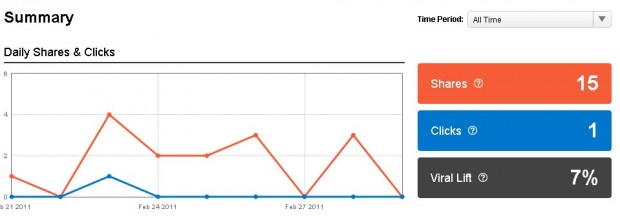
After a few days login to AddThis and check out your Analytics statistics to see how your customers have been sharing your products across various Social Media destinations.

Hi really nice its work for very lot !!!!!!!!!!!
Thank you