 This post was last updated 5 years 9 months 15 days ago, some of the information contained here may no longer be actual and any referenced software versions may have been updated!
In 2016 I started developing my own Home Automation systems (HA) using a Raspberry PI, PHP and FHEM. Initially I wanted to just control a few lights using cost efficient RF sockets and this worked really well. Since then I have enjoyed developing my HA system and am always looking for cheaper alternatives to the sometimes extremely expensive solutions you find online or in DIY stores. Last year (2017) I started looking for smart WiFi enabled sockets as a network controlled smart socket is much more reliable and has a wider transmission range than RF sockets. I also wanted to measure air and water temperature and found that the Sonoff TH smart switches were ideal for this.
The Sonoff TH10/TH16 are 90-250V (50/60hz) temperature and humidity monitoring WiFi smart switches supporting a maximum current of 10A (2200W) or 16A (3500W) with two purpose built sensors, one for temperature and one for humidity. Compared to most retail Wifi enabled switches they are extremely cost effective with an online price under USD 10. The switches are designed to be controlled by a free IOS or Android app but what makes them perfect for developing your own HA system is that they use an ESP8266 chip which means you can flash them with custom firmware and do just about whatever you want with them!
Recently (2018) I bought a couple of new TH16’s and found that a lot had changed since I first used them so here are are the steps currently required to FLASH, program and use a Sonoff TH16 as a Home Automation smart switch and temperature sensor controlled by PHP or FHEM.
Sonoff TH16
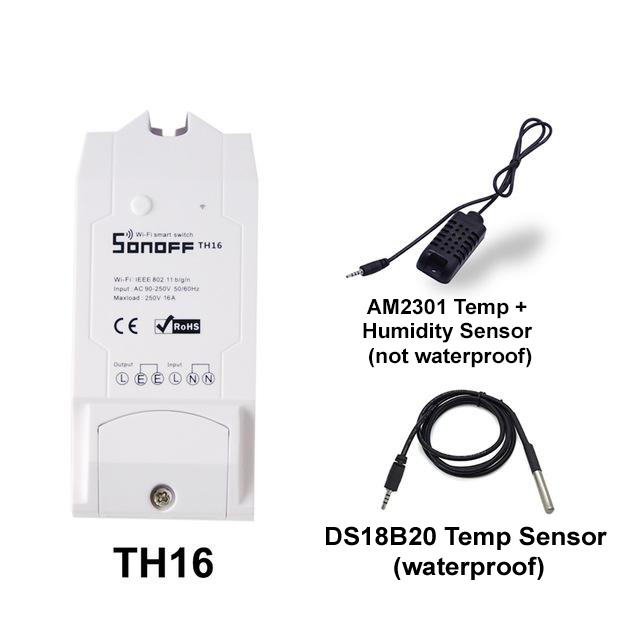
You can purchase the Sonoff TH16 at all your favourite online retailers including Amazon and eBay, whilst it is possible to build your own sensors if you want to monitor temperature or humidity then it’s easiest to also purchase the corresponding Sonoff sensor, for temperature I used the Sonoff Temp Sensor-DS18B20 which costs about USD 5. The temperature sensor is waterproof.
FLASH Firmware with ESPEasy
ESPEasy is open source firmware for ESP8266. “The ESP Easy firmware can be used to turn the ESP module into an easy multifunction sensor device for Home Automation solutions” in our case the ESP module is within the TH16, the ESPEasy firmware replaces the code supplied with the TH16 with the ESPEasy firmware version you choose to flash.
To flash the TH16 with new firmware you need to enable serial communication between a Windows PC and the TH16, you can do this by using a USB to TTL dongle CH340G (FT232RL or PL2303 based will also do) these are easily obtainable online. The dongle connects to a USB port on your PC creating a serial interface. You then connect the dongle to the TH16.
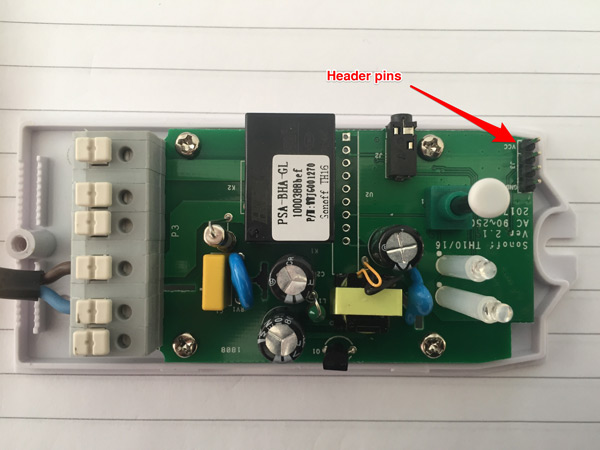
Before you can connect the dongle you must open up the TH16 and solder a header to the power, TX and RX pins on the TH16 circuit board. Header pins are easily available online, you will also need a soldering iron, solder and a steady hand.
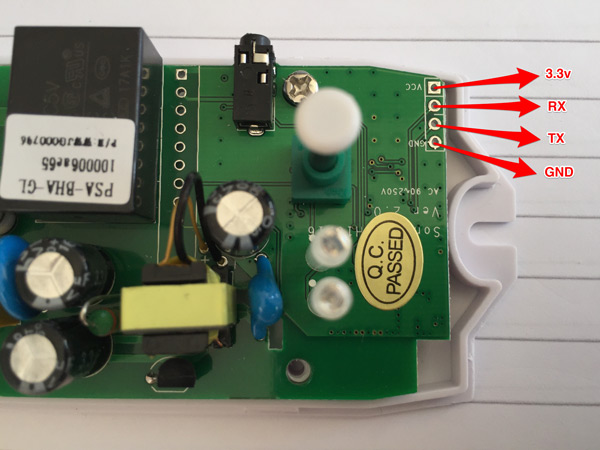
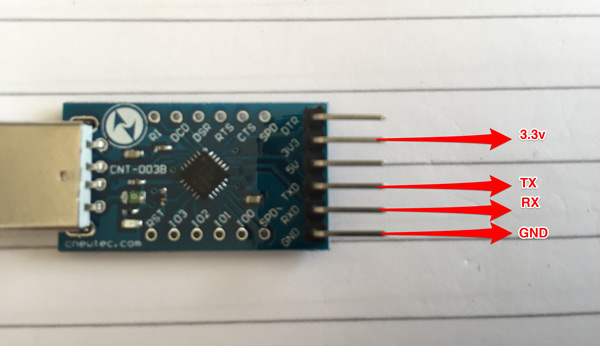
| Pin | Sonoff | USB |
|---|---|---|
| 1 | VCC | 3V3 |
| 2 | tx | RX |
| 3 | rx | TX |
| 4 | GND | GND |
Note, you may need to swap TX and RX round. The Sonoff circuit board version used here was v2.1
The currently advertised stable firmware is version 120 which is at least 2 years old, I recommend you flash the TH16 with the latest MEGA dev firmware which has nightly builds available from the github at https://github.com/letscontrolit/ESPEasy/releases
Download the ESPEasy_mega-XX.zip file and extract it. You will see various firmware binary images, we need a 1MB ESP8266 binary image so the DEV image ESP_Easy_mega-2018XXXX_dev_ESP8266_1024.bin is the image we will use to flash the TH16.
We need software to communicate with the TH16 and flash the new firmware to the 8266 chip, the esptool software supplied with the ESPEasy firmware no longer works with the latest versions of the Sonoff TH smart switches (v2.1). Download the nodemcu flasher here
For 32 bit Windows : https://github.com/nodemcu/nodemcu-flasher/blob/master/Win32/Release/ESP8266Flasher.exe
For 64 bit Windows : https://github.com/nodemcu/nodemcu-flasher/blob/master/Win64/Release/ESP8266Flasher.exe
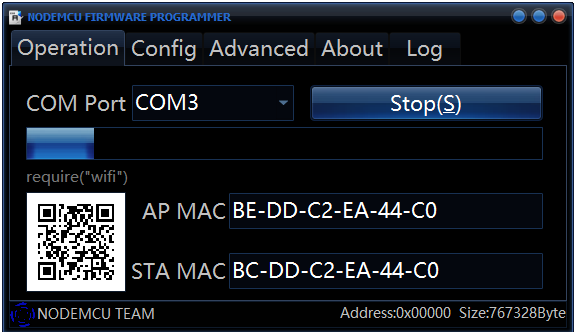
When you have all the software saved and the TH16 connections ready start the ESP8266Flasher. Now holding down the tall white button on the TH16 plug the TH16/USB dongle into your PC and release the tall white button this will configure the TH16 8266 chip for flash mode.
The nodemcu firmware programmer (ESP8266Flasher) should now detect the serial COM port connected to the TH16. If the port is not detected check in Windows device manager that the USB dongle is detected as a serial device and has been assigned a COM port.
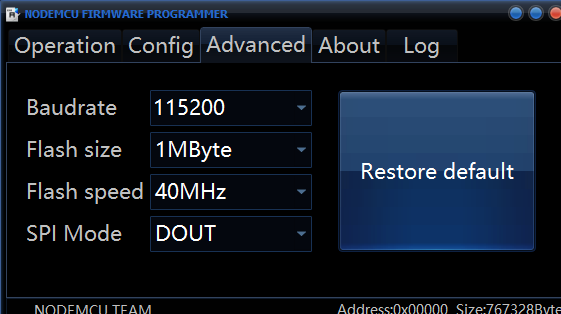
Click on the Advanced tab and configure the following settings
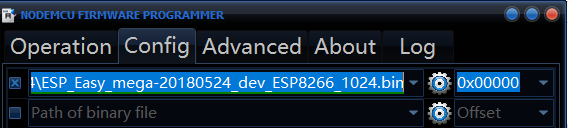
Click on the Config tab and select the 1MB ESP8266 binary image from the downloaded ESPEasy image folder
Now go back to the Operation tab and click the blue FLASH button to begin the flash process, a progress bar will be displayed and the process will take a couple of minutes to complete.
When the flash operation is complete you can disconnect the TH16 from your PC.
ESPEasy WLAN Configuration
You now need to power on the TH16 from the mains, so you first need to connect a mains cable (90-250v) to the device and power it up

When the TH16 is powered on after flashing it becomes a Wireless Access Point to allow you to connect to it and configure initial WLAN settings for the device. With a smart phone or other device connect to the WLAN name ESP_Easy_0 with the password configesp.
You should see a browser page asking for WLAN credentials. Select the WLAN you want the TH16 to connect to and enter the password. The TH16 should connect to the WLAN and inform you which IP address it has been assigned. I recommend you create a DHCP reservation for this address so that it is permanent.
You can now manage and configure the TH16 from a web browser using the url http://x.x.x.x where x.x.x.x is the IP address assigned to the TH16.
If you do not see the ESP_Easy_0 WLAN then the flashing process was not successful. Attempt to flash the device again, some users report that you should press and hold the tall white TH16 button and continue to hold it until the flashing process is complete.
ESPEasy Configuration
The TH16 is now powered on, connected to the WLAN with the DS18B20 temperature sensor plugged in. Note that the sensor plugs in using a small jack plug, the plug should push in and click into the socket. With my TH16 the hole in the casing prevented the sensor plug from clicking firmly into place and was not detected. I had to enlarge the casing hole in order for the sensor to connect properly and be detected.
Open a browser and enter the url of the TH16 to open the web based configuration : http://x.x.x.x
First give the device a name by clicking the Config tab and entering a Unit Name. If you are using FHEM (or another supported HA system) click on the Controllers tab and edit the credentials for your HA Controller server. For FHEM select FHEM HTTP from the Protocol list and enter the IP address of your FHEM server and the port used by the FHEM ESPEasy bridge (usually 8383 is used).

Click on the Devices tab
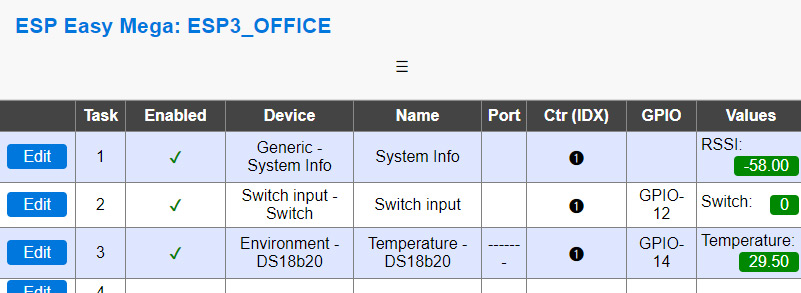
I have three devices configured
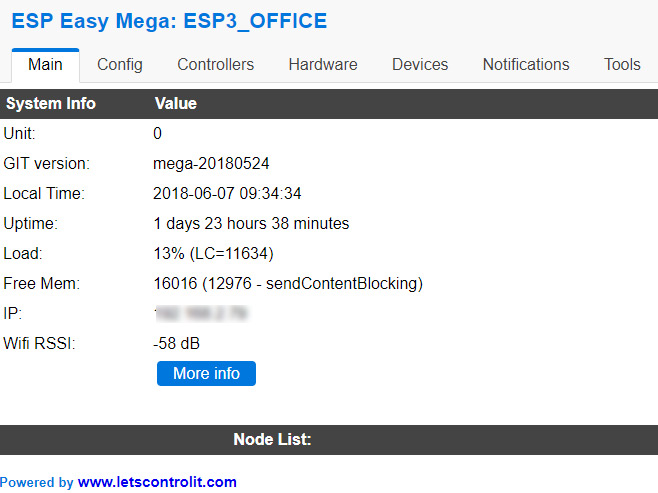
- Generic System Info is reporting the WLAN signal strength – this is used as a presence controller by FHEM.
- Switch Input is reporting the state of the built in power switch which is controller by GPIO 12
- Environment DS18b20 is reporting the state (temperature) of the DS18b20 sensor which is controlled by GPIO14
- if the sensor is not detected by the TH16 make sure if is connected properly
To configure these devices click the edit button and select the device type you want to configure from the drop down box, here is my configuration for the temperature sensor
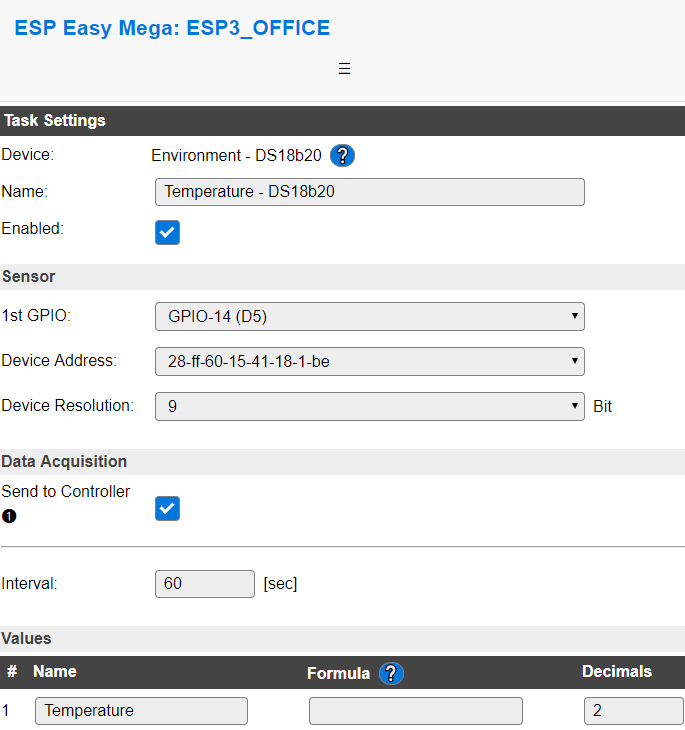
Make sure you check the enabled box before you save the device. You can see that I am also sending this data to the controller (FHEM). The interval determines how often the device value will be updated. Explore the other configuration options available, you may want to add an access password or an NTP time server for example.
With the three devices configured and working you will see the corresponding values displayed, switch status (1=ON, 0=OFF), temperature etc.
Retrieving Data and Controlling the Switch
The easiest way to retrieve data from the TH16 is via an http request that returns JSON data, simply browse to
http://x.x.x.x/json
Here you will see a nicely formatted json array of status data for the TH16 including the switch status and temperature sensor value
"TaskValues": [
{"ValueNumber":1,
"Name":"Temperature",
"NrDecimals":2,
"Value":29.50
}]
This makes retrieving data from the TH16 really simple if your are using PHP for example you can do something like this to get the data using curl and return it as a php array.
$_data=$this->curlAjaxRequest('http://x.x.x.x/json');

	public function curlAjaxRequest($_url)
	{

		try {
			$_curl = curl_init();

			$_header[0] = "Accept: text/xml,application/xml,application/xhtml+xml,";
			$_header[0] .= "text/html;q=0.9,text/plain;q=0.8,image/png,*/*;q=0.5";
			$_header[] = "Cache-Control: max-age=0";
			$_header[] = "Connection: keep-alive";
			$_header[] = "Keep-Alive: 300";
			$_header[] = "Accept-Charset: ISO-8859-1,utf-8;q=0.7,*;q=0.7";
			$_header[] = "Accept-Language: en;q=0.5";
			$_header[] = "Pragma: ";

			curl_setopt($_curl, CURLOPT_URL, $_url);
			curl_setopt($_curl, CURLOPT_USERAGENT, 'My Home Automation');
			curl_setopt($_curl, CURLOPT_HTTPHEADER, $_header);
			curl_setopt($_curl, CURLOPT_ENCODING, 'gzip,deflate');
			curl_setopt($_curl, CURLOPT_AUTOREFERER, true);
			curl_setopt($_curl, CURLOPT_RETURNTRANSFER, 1);
			curl_setopt($_curl, CURLOPT_TIMEOUT, 10);

			$_object = curl_exec($_curl); // execute the curl command
			curl_close($_curl); // close the connection

		}

		//catch exception
		catch(Exception $e) {

			// do nothing with $e
			return false;

		}

			return json_decode($_object,true);

	}
We can also control the TH16 using JSON commands. For example to turn the switch on or off using GPIO12 we can use
ON : http://x.x.x.x/control?cmd=GPIO,12,1
OFF : http://x.x.x.x/control?cmd=GPIO,12,0
Again using curl you can send these commands via PHP.
FHEM Configuration
If you are using FHEM there is already a FHEM module that supports the ESPEasy firmware. To configure FHEM you need to enable the ESPEasy bridge, this is done with the following commands
define espBridge ESPEasy bridge 8383
attr espBridge authentication 0
attr espBridge combineDevices 0
attr espBridge group ESPEasy Bridge
attr espBridge room ESPEasy
You can see here we enable a bridge called espBridge listening on TCP port 8383.
If you have configured FHEM with autocreate enabled you should now see the TH16 switch automatically configured when it next sends it’s data update. It will appear in FHEM under ESPEasy.
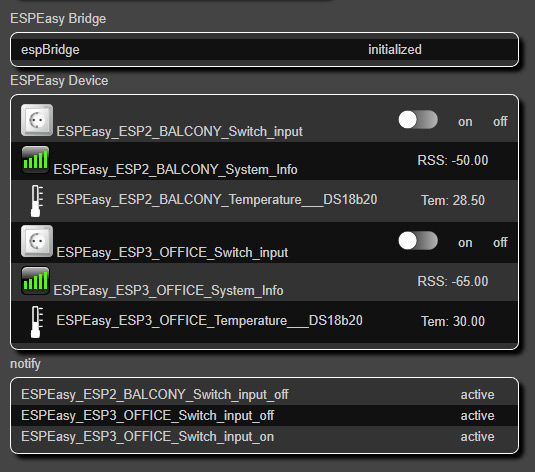
I configured FHEM with the following configuration for each TH16
# ESP3 - OFFICE
define ESPEasy_ESP3_OFFICE_Switch_input ESPEasy x.x.x.x 80 espBridge ESP3_Switch_input
attr ESPEasy_ESP3_OFFICE_Switch_input IODev espBridge
attr ESPEasy_ESP3_OFFICE_Switch_input Interval 300
attr ESPEasy_ESP3_OFFICE_Switch_input devStateIcon on:ios-on-green:on off:ios-off:ff absent:10px-kreis-rot:statusRequest .*:ios-NACK:check
attr ESPEasy_ESP3_OFFICE_Switch_input event-on-change-reading .*
attr ESPEasy_ESP3_OFFICE_Switch_input eventMap /gpio 12 on:on/gpio 12 off:off/status gpio 12:check/
attr ESPEasy_ESP3_OFFICE_Switch_input group ESPEasy Device
attr ESPEasy_ESP3_OFFICE_Switch_input icon ge_wht_steckdose
attr ESPEasy_ESP3_OFFICE_Switch_input presenceCheck 1
attr ESPEasy_ESP3_OFFICE_Switch_input readingSwitchText 1
attr ESPEasy_ESP3_OFFICE_Switch_input room ESPEasy
attr ESPEasy_ESP3_OFFICE_Switch_input setState 3
attr ESPEasy_ESP3_OFFICE_Switch_input stateFormat {ReadingsVal($name,"presence","") eq "absent" ? "absent" : ReadingsVal($name,"Switch","")}

define ESPEasy_ESP3_OFFICE_System_Info ESPEasy x.x.x.x 80 espBridge ESP3_System_Info
attr ESPEasy_ESP3_OFFICE_System_Info IODev espBridge
attr ESPEasy_ESP3_OFFICE_System_Info Interval 300
attr ESPEasy_ESP3_OFFICE_System_Info group ESPEasy Device
attr ESPEasy_ESP3_OFFICE_System_Info icon WLAN_Status.1
attr ESPEasy_ESP3_OFFICE_System_Info presenceCheck 1
attr ESPEasy_ESP3_OFFICE_System_Info readingSwitchText 1
attr ESPEasy_ESP3_OFFICE_System_Info room ESPEasy
attr ESPEasy_ESP3_OFFICE_System_Info setState 3

define ESPEasy_ESP3_OFFICE_Temperature___DS18b20 ESPEasy x.x.x.x 80 espBridge ESP3_Temperature___DS18b20
attr ESPEasy_ESP3_OFFICE_Temperature___DS18b20 IODev espBridge
attr ESPEasy_ESP3_OFFICE_Temperature___DS18b20 Interval 300
attr ESPEasy_ESP3_OFFICE_Temperature___DS18b20 group ESPEasy Device
attr ESPEasy_ESP3_OFFICE_Temperature___DS18b20 icon temp_temperature
attr ESPEasy_ESP3_OFFICE_Temperature___DS18b20 presenceCheck 1
attr ESPEasy_ESP3_OFFICE_Temperature___DS18b20 readingSwitchText 1
attr ESPEasy_ESP3_OFFICE_Temperature___DS18b20 room ESPEasy
attr ESPEasy_ESP3_OFFICE_Temperature___DS18b20 setState 3
I can now also use FHEM to control the switch by clicking on the GUI or using the commands
set ESPEasy_ESP3_OFFICE_Switch_input on
set ESPEasy_ESP3_OFFICE_Switch_input off
Conclusions
Even the cheapest WIFI enabled smart switches are at least three or four times expensive as the Sonoff and that does not include any kind of sensor. Using the TH16 with ESPEasy software is a really cheap and reliable way to deploy WiFi smart switches and sensors in your Home and if you are an electronic engineer then there are many more options available for building and connecting your own sensors to the TH16.
Resources
Comments