 This post was last updated 10 years 2 months 3 days ago, some of the information contained here may no longer be actual and any referenced software versions may have been updated!
It’s 2014 and I am still using the Apple Darwin Media server, but after years of being neglected by Apple it is starting to show it’s age. One of the main problems is that for Apple i devices there is no native RTSP support so streaming content from the Darwin server to portable devices is not so easy.
Apple have largely replaced RTSP with HTTP Live Streaming (HLS). HLS basically just cuts up video files into small MPEG video segments that can be downloaded/streamed via a normal website using the HTTP protocol.
This works pretty well for video content that you want to convert from say MP4 to HLS, you run a conversion process that transcodes the video into multiple 10 second segments that you serve up to clients via an .m3u8 reference file on your web server.
If you want to do this with live content then the process is similar but you will also need a client to transmit the live video to your server to transcode it into segments on the fly.
When I am streaming live RTSP content to my Darwin media server I use the Apple Quicktime Broadcaster (on my MAC) as its free and kinda works well. So lets use Quicktime Broadcaster (QTB) to stream live video to a server running FFMPEG which will transcode the video into HLS segments which can be served up by Apache (or your web seriver of choice) to HLS clients.
You can download the Quicktime Broadcaster for Mac here. It hasn’t been updated since 2009, so obviously isn’t high on Apples list of supported software anymore, but hey ho, it is free.
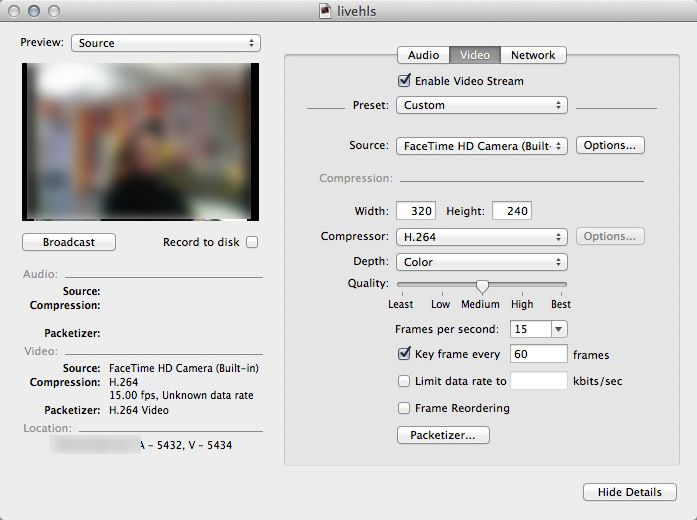
Fire up QTB and configure your video and audio settings.
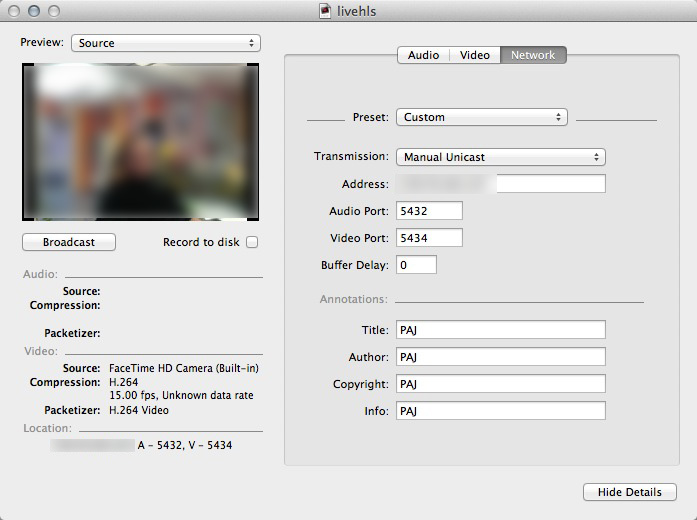
We will be creating a manual unicast connection and the screen shots below show the settings I used.
Set transmission to Manual Unicast. The address is the TCP/IP address of the server that will run FFMPEG. Note the port numbers used for audio and video, this info is saved in the .SDP file.
For this demo I am using my webcam as the source video. If you have an external device select it as the video source. Choose your compression options depending on the bandwidth available to you. Enable and configure audio compression in the same way.
Click broadcast and the client will attempt to unicast the video data to the server (even though nothing is listening yet).
Export these settings to a .sdp file by clicking File -> Export -> SDP save the SDP file and then upload it to your server.
Now we want to run FFMPEG so that it listens on the ports we specified, captures the unicast video and audio data, transcodes it into HLS segments and stores the HLS data to a publicly accesible area of your web server.
We do this by running FFMPEG with all the options we need, Here is an example command line :
ffmpeg -i /Dropbox/stream/hls.sdp -acodec libfaac -ac 2 -b:a 128k -vcodec libx264 -vpre libx264-ipod640 -b:v 500k -threads 0 -g 75 -level 3.1 -map 0 -vbsf h264_mp4toannexb -flags -global_header -f segment -segment_time 10 -segment_list hls.m3u8 -segment_list_flags +live -segment_list_entry_prefix http://tv.server.co.uk/media/ -segment_format mpegts stream%05d.ts
Here we are telling FFMPEG to use the SDP file we exported from QTB as the input, I saved it to my Dropbox. Then we are specifying the compression parameters for the transcoded MPEG transport stream (TS) files. You can easily find other examples of various FFMPEG compression options and use them depending on your requirements.
The segmenter options define how big the segments will be and where the .m3u8 file will be created – in this case I specified 10 second segments and the m3u8 file is being created in the folder where I ran FFMPEG from. The .m3u8 file and TS segments should be created in, or later moved to a folder accessible from the internet.
The segment_list_entry_prefix defines the prefix to the TS files in the m3u8 file, this is the configured url of your web server including the uri to your HLS files.
Finally the name used for the segment files is defined. Note the +Live segment_list_flags option, this tells ffmpeg that we will be transcoding live content. The official documentation for all these options can be found here.
Configure your ffmpeg options, start the QTB broadcast and run FFMPEG. If all is working you will see FFMPEG starting to receive and transcode the unicast video (and audio) data.
Now point your i-Phone/Pad/Pod or HLS client (i.e. VLC, Safari) to the m3u8 file on your webserver, i.e. from the options I used above the url would be :
http://tv.server.co.uk/media/hls.m3u8
You should see your live video stream.
My video stream had about a 60 second lag time. Disconnect and reconnect and you will see you are receiving live content – with the 60 second lag. Note that FFMPEG doesn’t automatically remove the old TS segments, you need to handle that yourself.
If it doesn’t work check FFMPEG for errors, note that some of the segment options need a relatively new version of FFMPEG to function. I downloaded and compiled the latest version of FFMPEG and it’s dependencies on my Ubuntu server using the guide found here.
Make sure the m3u8 file and MPEG TS segments are accessible from the web, open the m3u8 file in a text editor to check the url being used for each segment.
If FFMPEG starts dropping files it means your live data is coming in too fast for FFMPEG to process, you need to look at your compression settings. Try reducing the length of the TS segments from 10 seconds to 2 seconds, Remember your server must be able to transcode and save the live data within these times otherwise the stream will start to stutter.
hey,
thank you a lot for your greatest tutorial
i like it, and its working for me except of a small issue
i am trying to include several language in the hls stream
3 diferent audio stream: arabic, frensh & english
using the ffmpeg option -map
but, the hls clients dont see them
any idea?
thanks!
Sorry, I have not tried to include different language streams before, if you do find the answer please let me know!
Hi, overall this is a very good tutorial. Thank you. However, I am running ffmpeg on OSX Mavericks (10.9), I downloaded the compiled version of ffmpeg for OSX, I ran the command you have provided, I get this “File for preset ‘libx264-ipod640’ not found” error. Are there dependencies I have to download ? Thanks.
Until OSX 10.9 is officially released I wouldn’t be surprised if there are compatibility problems. I would try changing the preset to something else and see if it runs with that, you can find references to other presets on the web depending on what your encoding requirements are.
Hi PAJ, Thanks for the reply. I must say I am a complete noob to video streaming. I have finally got it working on rtsp, but what I really want is HLS so that I can use it on iOS devices and perhaps Android devices. I did some research on Apple’s site regarding HLS, supposedly Apple has a suit of tool for it, Media Stream Segmenter etc. I am wondering if this tool replaces FFMPEG
or vis versa. Is there an advantage using one over the other?
Thanks again. 🙂
I don’t have any experience with any Apple server side HLS streaming tools, my servers run Linux so I wouldn’t be able to use them anyway. If you do find a solution using free Apple software please let me know.