 This post was last updated 8 years 9 months 3 days ago, some of the information contained here may no longer be actual and any referenced software versions may have been updated!
In computing, active data is often cached to shorten data access times, reduce latency and improve input/output (I/O). Because almost all application workload is dependent upon I/O operations, caching is used to improve application performance.
Magento is a very data and database intensive application. By enabling the Magento system cache you will instantly see an improvement in response times as Magento starts to cache database queries and system data. The default cache storage code uses the file system, i.e. Magento saves cache data to disk. Whilst this will certainly improve Magento responsiveness there are other cache storage options available that are much faster and there are additional types of data we can also cache to improve the overall responsiveness and speed of a Magento CE application.
memcache and redis
For most computer systems the fastest data storage medium is the physical memory, using memory as cache storage results in very quick data access times and Magento can get it’s data much quicker. For CE users with a small to medium sized shop there are two free popular open source memory caching systems, Memcache and Redis. I have used Memcache in many different applications for fast access to relatively non volatile (i.e. cached) data objects.
In a PHP environment memcache is easy to install and easy to use. It also works out of the box with Magento simply by configuring memcache as a storage option within the cache settings of the magento local.xml file. Redis was relatively new to me and is a slightly more advanced key-value cache and object store, it can be thought of as a simple memory resident database.
There are a lot of discussions as to the pros and cons of memcache vs redis and for a complete Magento CE cache solution I would recommend using redis as it provides the best caching solution for Magento CE system, session and full page caches.
what to cache
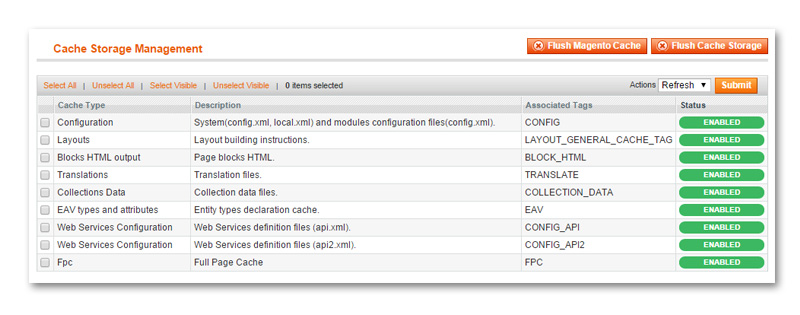
When you go to the Magento -> System -> Cache Management screen as shown above you will see the available cache storage management options for your Magento installation. Magento has a default built in cache management system that when enabled caches system data such as configuration, layouts, blocks, translations etc.
We can also use redis to create a fast Magento CE caching system for session and full page (fpc) data too.

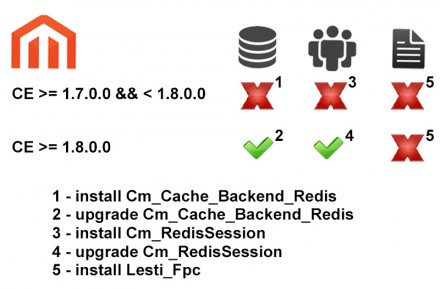
This blog will look at how to install and configure a system, session and full page cache management solution for Magento CE v1.7.0.0 or greater using redis on Ubuntu 14.04 LTS.
Install redis for Magento CE on Ubuntu 14.04
Installing redis on Ubuntu is dead easy, simply use the following two apt commands to install the server and php5 code. At the time of writing this will install redis v2.8.4.
apt-get install redis-server
apt-get install php5-redis
The redis server will install and start an instance with it’s default configuration listening on TCP port 6379. Check the server is running by typing redis-cli ping at the command prompt, you should get a satisfying PONG back.
We want to enable three Magento cache types : system, session and fpc (full page cache), whilst all three cache types could use one redis storage instance there are some issues where it is safer to give each cache type it’s own redis storage instance. This also allows us to specifically configure redis options for each cache type, for example we can configure volatile session data to be redis persistent.
Ideally we want to configure three redis instances per Magento CE installation or shop :
- system – redis port 6379
- session – redis port 6380
- fpc – redis port 6381
Configure multiple redis instances for Magento on Ubuntu 14.04
To configure multiple redis instances that will start at system startup we need to replace the default redis-server init script in /etc/init.d with the script below courtesy of robofirm.
Show redis-server multiple instance init script### BEGIN INIT INFO
# Provides: redis-server
# Required-Start: $syslog $remote_fs
# Required-Stop: $syslog $remote_fs
# Should-Start: $local_fs
# Should-Stop: $local_fs
# Default-Start: 2 3 4 5
# Default-Stop: 0 1 6
# Short-Description: redis-server – Persistent key-value db
# Description: redis-server – Persistent key-value db
### END INIT INFO
if [ -n "$2" ]
then
NAME=$2
PATH=/usr/local/sbin:/usr/local/bin:/sbin:/bin:/usr/sbin:/usr/bin
DAEMON=/usr/bin/redis-server
DAEMON_ARGS=/etc/redis/servers/$NAME.conf
DESC=redis-server
RUNDIR=/var/run/redis
PIDFILE=$RUNDIR/$NAME.pid
test -x $DAEMON || exit 0
set -e
case "$1" in
start)
echo -n "Starting $DESC: "
mkdir -p $RUNDIR
touch $PIDFILE
chown redis:redis $RUNDIR $PIDFILE
chmod 755 $RUNDIR
if start-stop-daemon –start –quiet –umask 007 –pidfile $PIDFILE –chuid redis:redis –exec $DAEMON — $DAEMON_ARGS
then
echo "$NAME."
else
echo "failed"
fi
;;
stop)
echo -n "Stopping $DESC: "
if start-stop-daemon –stop –retry forever/QUIT/1 –quiet –oknodo –pidfile $PIDFILE –exec $DAEMON
then
echo "$NAME."
else
echo "failed"
fi
rm -f $PIDFILE
;;
restart|force-reload)
${0} stop $2
${0} start $2
;;
status)
echo -n "$DESC is "
if start-stop-daemon –stop –quiet –signal 0 –name ${NAME} –pidfile ${PIDFILE}
then
echo "running"
else
echo "not running"
exit 1
fi
;;
*)
echo "Usage: /etc/init.d/$NAME {start|stop|restart|force-reload}" >&2
exit 1
;;
esac
else
FILES=/etc/redis/servers/*
for f in $FILES
do
SERVERNAME=$(sed ‘s|/etc/redis/servers/||g’ <<< $f)
SERVERNAME=$(sed ‘s|.conf||g’ <<< $SERVERNAME)
/etc/init.d/redis-server "$1" "$SERVERNAME"
done
fi
exit 0
[/bash]
Stop the redis server, change into the /etc/init.d folder and make a backup copy of the redis-server init script, then empty the original script, edit it and paste in the multi instance script from above.
service redis-server stop
cd /etc/init.d
cp redis-server redis-server.old
> redis-server
nano redis-server
The redis config files are saved in /etc/redis. We want to create a config file for each redis server cache storage instance in a new folder called servers.
cd /etc/redis
mkdir servers
cp redis.conf ./servers/server1.conf
cp redis.conf ./servers/server2.conf
cp redis.conf ./servers/server3.conf
Now we have three configuration files for our three caches :
- server1.conf – system (redis port 6379)
- server2.conf – session (redis port 6380)
- server3.conf – fpc (redis port 6381)
We need to edit each configuration file and configure the redis settings for each cache. There is a lot of configuration information in the default redis.conf file most of it relating to options that are commented out and not required. The most important settings are the TCP port numbers used for each instance, the process id, log file name and persistence data.
Redis can be configured to automatically save (or persist) cached data to disk, this is really useful for volatile cache data, i.e. data you do not want to lose. Essentially redis saves a dump of the cache data regularly to disk (in /var/lib/redis) so that if the redis instance crashes or the server is restarted the cached data is not lost. This is great for cached Magento session data, we want this data in fast cache storage but we do not want to lose the data unlike system and full page cache data where we don’t really care if the data is lost – it will just be cached again.
Below are three example config files for the three cache types, you can configure your instances with these settings, or use the info to customise the default config files created in the /servers folder. You must at least make the tcp port numbers and pids unique.
instance1 - server1.conf SYSTEM# SERVER 1 SHOP01
# MAGENTO SHOP01 DATA
maxmemory 1gb
maxmemory-policy volatile-lru
daemonize yes
port 6379
pidfile /var/run/redis/redis-server1.pid
logfile /var/log/redis/redis-server1.log
dbfilename redis-server1-dump.rdb
dir /var/lib/redis
bind 127.0.0.1
timeout 0
tcp-keepalive 0
loglevel notice
databases 16
################################ SNAPSHOTTING ################################
# SAVE DATA to DISK
#save 900 1
#save 300 10
#save 60 10000
stop-writes-on-bgsave-error yes
rdbcompression yes
rdbchecksum yes
# replication
repl-disable-tcp-nodelay no
slave-priority 100
appendonly no
appendfilename "appendonly.aof"
# appendfsync always
appendfsync everysec
no-appendfsync-on-rewrite no
auto-aof-rewrite-percentage 100
auto-aof-rewrite-min-size 64mb
lua-time-limit 5000
slowlog-log-slower-than 10000
slowlog-max-len 128
notify-keyspace-events ""
############################### ADVANCED CONFIG ###############################
# Hashes are encoded using a memory efficient data structure when they have a
# small number of entries, and the biggest entry does not exceed a given
# threshold. These thresholds can be configured using the following directives.
hash-max-ziplist-entries 512
hash-max-ziplist-value 64
# Similarly to hashes, small lists are also encoded in a special way in order
# to save a lot of space. The special representation is only used when
# you are under the following limits:
list-max-ziplist-entries 512
list-max-ziplist-value 64
# Sets have a special encoding in just one case: when a set is composed
# of just strings that happens to be integers in radix 10 in the range
# of 64 bit signed integers.
# The following configuration setting sets the limit in the size of the
# set in order to use this special memory saving encoding.
set-max-intset-entries 512
# Similarly to hashes and lists, sorted sets are also specially encoded in
# order to save a lot of space. This encoding is only used when the length and
# elements of a sorted set are below the following limits:
zset-max-ziplist-entries 128
zset-max-ziplist-value 64
# Active rehashing uses 1 millisecond every 100 milliseconds of CPU time in
# order to help rehashing the main Redis hash table (the one mapping top-level
# keys to values). The hash table implementation Redis uses (see dict.c)
# performs a lazy rehashing: the more operation you run into a hash table
# that is rehashing, the more rehashing "steps" are performed, so if the
# server is idle the rehashing is never complete and some more memory is used
# by the hash table.
#
# The default is to use this millisecond 10 times every second in order to
# active rehashing the main dictionaries, freeing memory when possible.
#
# If unsure:
# use "activerehashing no" if you have hard latency requirements and it is
# not a good thing in your environment that Redis can reply form time to time
# to queries with 2 milliseconds delay.
#
# use "activerehashing yes" if you don’t have such hard requirements but
# want to free memory asap when possible.
activerehashing yes
# The client output buffer limits can be used to force disconnection of clients
# that are not reading data from the server fast enough for some reason (a
# common reason is that a Pub/Sub client can’t consume messages as fast as the
# publisher can produce them).
#
# The limit can be set differently for the three different classes of clients:
#
# normal -> normal clients
# slave -> slave clients and MONITOR clients
# pubsub -> clients subscribed to at least one pubsub channel or pattern
#
# The syntax of every client-output-buffer-limit directive is the following:
#
# client-output-buffer-limit <class> <hard limit> <soft limit> <soft seconds>
#
# A client is immediately disconnected once the hard limit is reached, or if
# the soft limit is reached and remains reached for the specified number of
# seconds (continuously).
# So for instance if the hard limit is 32 megabytes and the soft limit is
# 16 megabytes / 10 seconds, the client will get disconnected immediately
# if the size of the output buffers reach 32 megabytes, but will also get
# disconnected if the client reaches 16 megabytes and continuously overcomes
# the limit for 10 seconds.
#
# By default normal clients are not limited because they don’t receive data
# without asking (in a push way), but just after a request, so only
# asynchronous clients may create a scenario where data is requested faster
# than it can read.
#
# Instead there is a default limit for pubsub and slave clients, since
# subscribers and slaves receive data in a push fashion.
#
# Both the hard or the soft limit can be disabled by setting them to zero.
client-output-buffer-limit normal 0 0 0
client-output-buffer-limit slave 256mb 64mb 60
client-output-buffer-limit pubsub 32mb 8mb 60
# Redis calls an internal function to perform many background tasks, like
# closing connections of clients in timeout, purging expired keys that are
# never requested, and so forth.
#
# Not all tasks are performed with the same frequency, but Redis checks for
# tasks to perform accordingly to the specified "hz" value.
#
# By default "hz" is set to 10. Raising the value will use more CPU when
# Redis is idle, but at the same time will make Redis more responsive when
# there are many keys expiring at the same time, and timeouts may be
# handled with more precision.
#
# The range is between 1 and 500, however a value over 100 is usually not
# a good idea. Most users should use the default of 10 and raise this up to
# 100 only in environments where very low latency is required.
hz 10
# When a child rewrites the AOF file, if the following option is enabled
# the file will be fsync-ed every 32 MB of data generated. This is useful
# in order to commit the file to the disk more incrementally and avoid
# big latency spikes.
aof-rewrite-incremental-fsync yes
[/text]
# SERVER 2 SHOP01
# MAGENTO SHOP01 SESSIONS
maxmemory 1gb
maxmemory-policy volatile-lru
daemonize yes
port 6380
pidfile /var/run/redis/redis-server2.pid
logfile /var/log/redis/redis-server2.log
dbfilename redis-server2-dump.rdb
dir /var/lib/redis
bind 127.0.0.1
timeout 0
tcp-keepalive 0
loglevel notice
databases 16
################################ SNAPSHOTTING ################################
# SAVE DATA to DISK
save 900 1
save 300 10
save 60 10000
stop-writes-on-bgsave-error yes
rdbcompression yes
rdbchecksum yes
# replication
repl-disable-tcp-nodelay no
slave-priority 100
appendonly no
appendfilename "appendonly.aof"
# appendfsync always
appendfsync everysec
no-appendfsync-on-rewrite no
auto-aof-rewrite-percentage 100
auto-aof-rewrite-min-size 64mb
lua-time-limit 5000
slowlog-log-slower-than 10000
slowlog-max-len 128
notify-keyspace-events ""
############################### ADVANCED CONFIG ###############################
# Hashes are encoded using a memory efficient data structure when they have a
# small number of entries, and the biggest entry does not exceed a given
# threshold. These thresholds can be configured using the following directives.
hash-max-ziplist-entries 512
hash-max-ziplist-value 64
# Similarly to hashes, small lists are also encoded in a special way in order
# to save a lot of space. The special representation is only used when
# you are under the following limits:
list-max-ziplist-entries 512
list-max-ziplist-value 64
# Sets have a special encoding in just one case: when a set is composed
# of just strings that happens to be integers in radix 10 in the range
# of 64 bit signed integers.
# The following configuration setting sets the limit in the size of the
# set in order to use this special memory saving encoding.
set-max-intset-entries 512
# Similarly to hashes and lists, sorted sets are also specially encoded in
# order to save a lot of space. This encoding is only used when the length and
# elements of a sorted set are below the following limits:
zset-max-ziplist-entries 128
zset-max-ziplist-value 64
# Active rehashing uses 1 millisecond every 100 milliseconds of CPU time in
# order to help rehashing the main Redis hash table (the one mapping top-level
# keys to values). The hash table implementation Redis uses (see dict.c)
# performs a lazy rehashing: the more operation you run into a hash table
# that is rehashing, the more rehashing "steps" are performed, so if the
# server is idle the rehashing is never complete and some more memory is used
# by the hash table.
#
# The default is to use this millisecond 10 times every second in order to
# active rehashing the main dictionaries, freeing memory when possible.
#
# If unsure:
# use "activerehashing no" if you have hard latency requirements and it is
# not a good thing in your environment that Redis can reply form time to time
# to queries with 2 milliseconds delay.
#
# use "activerehashing yes" if you don’t have such hard requirements but
# want to free memory asap when possible.
activerehashing yes
# The client output buffer limits can be used to force disconnection of clients
# that are not reading data from the server fast enough for some reason (a
# common reason is that a Pub/Sub client can’t consume messages as fast as the
# publisher can produce them).
#
# The limit can be set differently for the three different classes of clients:
#
# normal -> normal clients
# slave -> slave clients and MONITOR clients
# pubsub -> clients subscribed to at least one pubsub channel or pattern
#
# The syntax of every client-output-buffer-limit directive is the following:
#
# client-output-buffer-limit <class> <hard limit> <soft limit> <soft seconds>
#
# A client is immediately disconnected once the hard limit is reached, or if
# the soft limit is reached and remains reached for the specified number of
# seconds (continuously).
# So for instance if the hard limit is 32 megabytes and the soft limit is
# 16 megabytes / 10 seconds, the client will get disconnected immediately
# if the size of the output buffers reach 32 megabytes, but will also get
# disconnected if the client reaches 16 megabytes and continuously overcomes
# the limit for 10 seconds.
#
# By default normal clients are not limited because they don’t receive data
# without asking (in a push way), but just after a request, so only
# asynchronous clients may create a scenario where data is requested faster
# than it can read.
#
# Instead there is a default limit for pubsub and slave clients, since
# subscribers and slaves receive data in a push fashion.
#
# Both the hard or the soft limit can be disabled by setting them to zero.
client-output-buffer-limit normal 0 0 0
client-output-buffer-limit slave 256mb 64mb 60
client-output-buffer-limit pubsub 32mb 8mb 60
# Redis calls an internal function to perform many background tasks, like
# closing connections of clients in timeout, purging expired keys that are
# never requested, and so forth.
#
# Not all tasks are performed with the same frequency, but Redis checks for
# tasks to perform accordingly to the specified "hz" value.
#
# By default "hz" is set to 10. Raising the value will use more CPU when
# Redis is idle, but at the same time will make Redis more responsive when
# there are many keys expiring at the same time, and timeouts may be
# handled with more precision.
#
# The range is between 1 and 500, however a value over 100 is usually not
# a good idea. Most users should use the default of 10 and raise this up to
# 100 only in environments where very low latency is required.
hz 10
# When a child rewrites the AOF file, if the following option is enabled
# the file will be fsync-ed every 32 MB of data generated. This is useful
# in order to commit the file to the disk more incrementally and avoid
# big latency spikes.
aof-rewrite-incremental-fsync yes
[/text]
# SERVER 3 SHOP01
# MAGENTO SHOP01 FPC
maxmemory 1gb
maxmemory-policy volatile-lru
daemonize yes
port 6381
pidfile /var/run/redis/redis-server3.pid
logfile /var/log/redis/redis-server3.log
dbfilename redis-server3-dump.rdb
dir /var/lib/redis
bind 127.0.0.1
timeout 0
tcp-keepalive 0
loglevel notice
databases 16
################################ SNAPSHOTTING ################################
# SAVE DATA to DISK
#save 900 1
#save 300 10
#save 60 10000
stop-writes-on-bgsave-error yes
rdbcompression yes
rdbchecksum yes
# replication
repl-disable-tcp-nodelay no
slave-priority 100
appendonly no
appendfilename "appendonly.aof"
# appendfsync always
appendfsync everysec
no-appendfsync-on-rewrite no
auto-aof-rewrite-percentage 100
auto-aof-rewrite-min-size 64mb
lua-time-limit 5000
slowlog-log-slower-than 10000
slowlog-max-len 128
notify-keyspace-events ""
############################### ADVANCED CONFIG ###############################
# Hashes are encoded using a memory efficient data structure when they have a
# small number of entries, and the biggest entry does not exceed a given
# threshold. These thresholds can be configured using the following directives.
hash-max-ziplist-entries 512
hash-max-ziplist-value 64
# Similarly to hashes, small lists are also encoded in a special way in order
# to save a lot of space. The special representation is only used when
# you are under the following limits:
list-max-ziplist-entries 512
list-max-ziplist-value 64
# Sets have a special encoding in just one case: when a set is composed
# of just strings that happens to be integers in radix 10 in the range
# of 64 bit signed integers.
# The following configuration setting sets the limit in the size of the
# set in order to use this special memory saving encoding.
set-max-intset-entries 512
# Similarly to hashes and lists, sorted sets are also specially encoded in
# order to save a lot of space. This encoding is only used when the length and
# elements of a sorted set are below the following limits:
zset-max-ziplist-entries 128
zset-max-ziplist-value 64
# Active rehashing uses 1 millisecond every 100 milliseconds of CPU time in
# order to help rehashing the main Redis hash table (the one mapping top-level
# keys to values). The hash table implementation Redis uses (see dict.c)
# performs a lazy rehashing: the more operation you run into a hash table
# that is rehashing, the more rehashing "steps" are performed, so if the
# server is idle the rehashing is never complete and some more memory is used
# by the hash table.
#
# The default is to use this millisecond 10 times every second in order to
# active rehashing the main dictionaries, freeing memory when possible.
#
# If unsure:
# use "activerehashing no" if you have hard latency requirements and it is
# not a good thing in your environment that Redis can reply form time to time
# to queries with 2 milliseconds delay.
#
# use "activerehashing yes" if you don’t have such hard requirements but
# want to free memory asap when possible.
activerehashing yes
# The client output buffer limits can be used to force disconnection of clients
# that are not reading data from the server fast enough for some reason (a
# common reason is that a Pub/Sub client can’t consume messages as fast as the
# publisher can produce them).
#
# The limit can be set differently for the three different classes of clients:
#
# normal -> normal clients
# slave -> slave clients and MONITOR clients
# pubsub -> clients subscribed to at least one pubsub channel or pattern
#
# The syntax of every client-output-buffer-limit directive is the following:
#
# client-output-buffer-limit <class> <hard limit> <soft limit> <soft seconds>
#
# A client is immediately disconnected once the hard limit is reached, or if
# the soft limit is reached and remains reached for the specified number of
# seconds (continuously).
# So for instance if the hard limit is 32 megabytes and the soft limit is
# 16 megabytes / 10 seconds, the client will get disconnected immediately
# if the size of the output buffers reach 32 megabytes, but will also get
# disconnected if the client reaches 16 megabytes and continuously overcomes
# the limit for 10 seconds.
#
# By default normal clients are not limited because they don’t receive data
# without asking (in a push way), but just after a request, so only
# asynchronous clients may create a scenario where data is requested faster
# than it can read.
#
# Instead there is a default limit for pubsub and slave clients, since
# subscribers and slaves receive data in a push fashion.
#
# Both the hard or the soft limit can be disabled by setting them to zero.
client-output-buffer-limit normal 0 0 0
client-output-buffer-limit slave 256mb 64mb 60
client-output-buffer-limit pubsub 32mb 8mb 60
# Redis calls an internal function to perform many background tasks, like
# closing connections of clients in timeout, purging expired keys that are
# never requested, and so forth.
#
# Not all tasks are performed with the same frequency, but Redis checks for
# tasks to perform accordingly to the specified "hz" value.
#
# By default "hz" is set to 10. Raising the value will use more CPU when
# Redis is idle, but at the same time will make Redis more responsive when
# there are many keys expiring at the same time, and timeouts may be
# handled with more precision.
#
# The range is between 1 and 500, however a value over 100 is usually not
# a good idea. Most users should use the default of 10 and raise this up to
# 100 only in environments where very low latency is required.
hz 10
# When a child rewrites the AOF file, if the following option is enabled
# the file will be fsync-ed every 32 MB of data generated. This is useful
# in order to commit the file to the disk more incrementally and avoid
# big latency spikes.
aof-rewrite-incremental-fsync yes
[/text]
Now we can start the three redis server instances with
service redis-server start
Install and configure redis Magento backend system cache Cm_Cache_Backend_Redis
Support for redis as a Magento system cache started life as a Magento community project. Meet Colin Mollenhour who appears to be the main genius behind the modules developed to use redis as a Magento/Zend cache storage system (as well as the mighty modman). Such was the popularity of Colin’s backend system cache module it was included as part of the Magento core distribution as of Magento CE version 1.8.0.0. You will find Mage_Cache_Backend_Redis declared in lib/Mage/Cache/Backend/Redis.php which since version 1.8.0.0 extends Colin’s Cm_Cache_Backend_Redis in lib/Cm/Cache/Backend/Redis.
You can find the source code to the Cm_Cache_Backend_Redis backend system cache redis module as well as support information here. I asked Colin what his recommendation was for updating Cm_Cache_Backend_Redis and his answer was ‘ I definitely recommend the latest master from github for all versions of Magento.’ So you need to be running Magento CE vesion 1.7.0.0 or newer and should install the latest vesion of Cm_Cache_Backend_Redis from the github.
Install Cm_Cache_Backend_Redis with modman
You can install Cm_Cache_Backend_Redis by simply cloning/downloading the git source and then copying the files into your Magento root folder. However a much better way of installing this code (and all community modules for Magento) is to use modman, the module manager also created by Colin Mollenhour. I was a bit apprehensive about modman at first as I didn’t fully understand how it was working and did not want to lose control over where magento module files were installed but once you are familiar with it, it really does make module installation and management a hell of a lot easier.
Install modman
If you have never used modman before install it from the command line, it is a script file that will require execution permissions.
bash < <(curl -s -L https://raw.github.com/colinmollenhour/modman/master/modman-installer)
Done. Modman installed in /root/bin/modman
mv /root/bin/modman /home/myapps/
export PATH=/home/myapps:$PATH
Modman lets you store all your Magento module code in one location independant of your actual Magento installation. This is useful as it lets you manage and control your module code seperately from Magentos core code and folder structure, this makes installing, testing, updating and removing modules much easier. Modman works by creating symlinks within the Magento application to the real module files in a .modman folder. Before using modman make sure you enable “Allow Symlinks” (found under System > Configuration > Advanced > Developer -> Template Settings).
Once you have installed the modman script you need to determine where modman will be initialised and your modman folder will be installed. I recommend you initialise modman in a folder outwith your Magento installation. For example if Magento is installed in /home/www/magento initialise modman in /home/www then create a .basedir file to tell modman where the Magento application is installed relative to the .modman folder i.e. magento
cd /home/www
modman init
Initialized Module Manager at /home/www
cd .modman
echo magento > .basedir
cd ../magento
Now you have modman installed and initialised and can install any Magento module that supports modman.
To install Cm_Cache_Backend_Redis make sure you are in your Magento application folder and enter
modman clone git://github.com/colinmollenhour/Cm_Cache_Backend_Redis.gitCloning into 'Cm_Cache_Backend_Redis'...
remote: Total 671 (delta 0), reused 0 (delta 0), pack-reused 671
Receiving objects: 100% (671/671), 125.21 KiB | 0 bytes/s, done.
Resolving deltas: 100% (213/213), done.
Checking connectivity… done.
Submodule ‘lib/Credis’ (https://github.com/colinmollenhour/credis.git) registered for path ‘lib/Credis’
Cloning into ‘lib/Credis’…
remote: Counting objects: 696, done.
remote: Total 696 (delta 0), reused 0 (delta 0), pack-reused 696
Receiving objects: 100% (696/696), 186.95 KiB | 0 bytes/s, done.
Resolving deltas: 100% (395/395), done.
Checking connectivity… done.
Submodule path ‘lib/Credis’: checked out ‘e8244e74b354df5a07353acf763996832b1c9928’
Applied: Cm/Cache/Backend/* app/code/community/Cm/Cache/Backend/Redis.php
WARNING: Removing conflicting directory: /home/www/dev/magento/lib/Credis
Applied: lib/* lib/Credis
Successfully create symlink new module ‘Cm_Cache_Backend_Redis’
modman installs Cm_Cache_Backend_Redis and we can now configure the system cache in Magento.
Configure Magento redis system cache
To configure Magento to use the Cm_Cache_Backend_Redis module to cache system data we need to edit the Magento /app/etc/local.xml file and within the global tags add backend system cache redis configuration as shown below, note Cm_Cache_Backend_Redis is defined as the backend cache module. Also note the port number we are using for the backend system cache is the port number of our first redis instance 6379 and the compression method being uses is gzip.
<cache>
	<backend>Cm_Cache_Backend_Redis</backend>
		 <backend_options>
			<server>127.0.0.1</server>
			<port>6379</port>
			<persistent></persistent>
			<database>0</database>
			<password></password>
			<force_standalone>0</force_standalone>
			<connect_retries>1</connect_retries>
			<read_timeout>10</read_timeout>
			<automatic_cleaning_factor>0</automatic_cleaning_factor>
			<compress_data>1</compress_data>
			<compress_tags>1</compress_tags>
			<compress_threshold>20480</compress_threshold>
			<compression_lib>gzip</compression_lib>
			<use_lua>0</use_lua>
		 </backend_options>
  </cache>
You will notice in the /app/etc folder a local.xml.additional file here you will find other configuration examples including the redis cache config above. Now go to System -> Cache Management in Magento admin and enable/refresh the cache to enable the new configuration. Magento is now using redis server instance 1 (db 0) on tcp port 6379 to cache backend Magento system data.
Monitor Magento redis system cache
We want to be sure that everything is working and Magento is actually using redis in the way we want it to. There are a few ways to monitor redis and confirm our configuration is working. The first is via the command line. You can monitor a specific redis instance by telnetting to the redis port on locahost and issuing the MONITOR command :
telnet localhost 6379
Trying 127.0.0.1...
Connected to localhost.localdomain.
Escape character is '^]'.
MONITOR
+OK
+1434702244.302408 [0 127.0.0.1:50415] "SELECT" "0"
+1434702244.303202 [0 127.0.0.1:50415] "HGET" "zc:k:cc4_CORE_CACHE_OPTIONS" "d"
+1434702244.303360 [0 127.0.0.1:50415] "HGET" "zc:k:cc4_CONFIG_GLOBAL_LOCK" "d"
+1434702244.303652 [0 127.0.0.1:50415] "HGET" "zc:k:cc4_CONFIG_GLOBAL" "d"
+1434702244.328254 [0 127.0.0.1:50415] "HGET" "zc:k:cc4_APP_4E4ABDD8DC00C3DACB3C1597944A3B6C" "d"
+1434702244.328821 [0 127.0.0.1:50415] "HGET" "zc:k:cc4_STORE_ADMIN_CONFIG_CACHE" "d"
+1434702244.329252 [0 127.0.0.1:50415] "HGET" "zc:k:cc4_APP_B1FB6E8F13287C01E5C05063633DDA4C" "d"
+1434702244.329791 [0 127.0.0.1:50415] "HGET" "zc:k:cc4_APP_E4D52B98688947405EDE639E947EE03D" "d"
+1434702244.330144 [0 127.0.0.1:50415] "HGET" "zc:k:cc4_STORE_DE_CONFIG_CACHE" "d"
+1434702244.330371 [0 127.0.0.1:50415] "HGET" "zc:k:cc4_STORE_EN_CONFIG_CACHE" "d"
+1434702244.332765 [0 127.0.0.1:50415] "HGET" "zc:k:cc4_CONFIG_GLOBAL_STORES_DE" "d"
QUIT
+OK
Connection closed by foreign host.
Here we are connecting to the system cache redis instance on port 6379 and if you browse your Magento site you should see redis cache activity as Magento saves or gets data from the cache. To monitor all redis server activity use redis-cli monitor from the command line. Note that the monitor command consumes a lot of redis resources so don’t leave it running!
There are two other graphical administration tools we can use to monitor redis activity check out how to install these later in the blog.
Install and configure redis Magento session cache Cm_RedisSession
Cm_RedisSession is another module from Colin Mollenhour that enables Magento to use redis as a cache storage system for Magento session data. By default Magento saves session data to the file system in the Magento var/session folder. Each session file is about 4Kb in size and over time the var/session folder can grow quite large if not managed. The second option for session storage in Magento is to use the Magento MySQL database. I have always avoided doing this as I don’t think session data belongs in the Magento database.
Cm_RedisSession rewrites the Magento db session save code to use redis instead of the database.
Install Cm_RedisSession with modman
Again, as with Cm_Cache_Backend_Redis if you are running Magento version 1.8.0.0 or greater Cm_RedisSession is already installed but you should upgrade it to the latest version.
In your Magento application folder install Cm_RedisSession with modman :
modman clone git://github.com/colinmollenhour/Cm_RedisSession.gitCloning into 'Cm_RedisSession'...
Cloning into ‘Cm_RedisSession’…
remote: Counting objects: 562, done.
remote: Total 562 (delta 0), reused 0 (delta 0), pack-reused 562
Receiving objects: 100% (562/562), 151.45 KiB | 0 bytes/s, done.
Resolving deltas: 100% (221/221), done.
Checking connectivity… done.
Submodule ‘lib/Credis’ (git://github.com/colinmollenhour/credis.git) registered for path ‘lib/Credis’
Cloning into ‘lib/Credis’…
remote: Counting objects: 696, done.
remote: Total 696 (delta 0), reused 0 (delta 0), pack-reused 696
Receiving objects: 100% (696/696), 186.95 KiB | 0 bytes/s, done.
Resolving deltas: 100% (395/395), done.
Checking connectivity… done.
Submodule path ‘lib/Credis’: checked out ‘7bd47b61fc3dad28aa881de45c71026256ad27cc’
WARNING: Removing conflicting directory: /home/www/dev/magento/app/code/community/Cm/RedisSession
Applied: code app/code/community/Cm/RedisSession
WARNING: Removing conflicting regular file: /home/www/dev/magento/app/etc/modules/Cm_RedisSession.xml
Applied: Cm_RedisSession.xml app/etc/modules/Cm_RedisSession.xml
WARNING: Removing conflicting symbolic link: /home/www/dev/magento/lib/Credis
Applied: lib/Credis lib/Credis
Successfully create symlink new module ‘Cm_RedisSession’
[/text]
Configure Magento redis session cache
Again in /app/etc/local.xml.additional you will see a configuration example for the redis session cache, note that the configuration example from Colin is more complete and that is the one I am using here. Edit your local.xml file and add the configuration below between the global tags. Note that we specify our second redis instance on port 6380 as the session cache, also note Colin’s module uses the session_save db value normally used to store sessions in MySQL. Cm_RedisSession rewrites this code to use redis, using the db value here also means Magento will fallback (hopefully) to using MySQL to store session data should redis fail.
        <session_save>db</session_save>
        <redis_session>                       <!-- All options seen here are the defaults -->
            <host>127.0.0.1</host>            <!-- Specify an absolute path if using a unix socket -->
            <port>6380</port>
            <password></password>             <!-- Specify if your Redis server requires authentication -->
            <timeout>2.5</timeout>            <!-- This is the Redis connection timeout, not the locking timeout -->
            <persistent></persistent>         <!-- Specify unique string to enable persistent connections. E.g.: sess-db0; bugs with phpredis and php-fpm are known: https://github.com/nicolasff/phpredis/issues/70 -->
            <db>0</db>                        <!-- Redis database number; protection from accidental loss is improved by using a unique DB number for sessions -->
            <compression_threshold>2048</compression_threshold>  <!-- Set to 0 to disable compression (recommended when suhosin.session.encrypt=on); known bug with strings over 64k: https://github.com/colinmollenhour/Cm_Cache_Backend_Redis/issues/18 -->
            <compression_lib>gzip</compression_lib>              <!-- gzip, lzf, lz4 or snappy -->
            <log_level>1</log_level>               <!-- 0 (emergency: system is unusable), 4 (warning; additional information, recommended), 5 (notice: normal but significant condition), 6 (info: informational messages), 7 (debug: the most information for development/testing) -->
            <max_concurrency>6</max_concurrency>                 <!-- maximum number of processes that can wait for a lock on one session; for large production clusters, set this to at least 10% of the number of PHP processes -->
            <break_after_frontend>5</break_after_frontend>       <!-- seconds to wait for a session lock in the frontend; not as critical as admin -->
            <break_after_adminhtml>30</break_after_adminhtml>
            <first_lifetime>600</first_lifetime>                 <!-- Lifetime of session for non-bots on the first write. 0 to disable -->
            <bot_first_lifetime>60</bot_first_lifetime>          <!-- Lifetime of session for bots on the first write. 0 to disable -->
            <bot_lifetime>7200</bot_lifetime>                    <!-- Lifetime of session for bots on subsequent writes. 0 to disable -->
            <disable_locking>0</disable_locking>                 <!-- Disable session locking entirely. -->
            <min_lifetime>60</min_lifetime>                      <!-- Set the minimum session lifetime -->
            <max_lifetime>2592000</max_lifetime>                 <!-- Set the maximum session lifetime -->
        </redis_session>
Refresh your Magento configuration to enable the Magento redis session cache.
Remember that when you change your session cache your existing session data will not be automatically imported. Depending on how important retaining existing session data is you may want to import your session data from the file system or database into redis. This will then maintain all existing session data, i.e. logged in customers will remain logged in, and customer session data will not be lost.
Colin Mollenhour has included a utility to allow you to import your session data. The following commands will put your shop into maintenance mode, to stop the creation of any new sessions, and import session data from the file system. You can find more information on this migration process here.
touch maintenance.flag   # Enter maintenance mode
sleep 2                  # Allow any running processes to complete
# This will copy sessions into redis and clear the config cache so local.xml changes will take effect
php ../.modman/Cm_RedisSession/migrateSessions.php -y
rm maintenance.flag      # All done, exit maintenance mode
If the import script returns an error it means you have not yet configured or enabled the redis session cache in local.xml.
Now that you have imported existing session data you can delete the contents of your Magento var/session folder, this folder should now stay empty.
Monitor Magento redis session cache
Again we can confirm the redis session cache is working by monitoring the session cache instance on TCP port 6380. Browse to your Magento site in an incognito browser session to force Magento to create new session data, you will see the session data appear in the monitor window.
telnet localhost 6380
Trying 127.0.0.1...
Connected to localhost.localdomain.
Escape character is '^]'.
MONITOR
+OK
+1434705128.835230 [0 127.0.0.1:58060] "SELECT" "0"
+1434705128.835387 [0 127.0.0.1:58060] "HINCRBY" "sess_8fdjpoeco2panshj38m7d6cd36" "lock" "1"
+1434705128.835523 [0 127.0.0.1:58060] "HMGET" "sess_8fdjpoeco2panshj38m7d6cd36" "data" "writes"
+1434705128.835889 [0 127.0.0.1:58060] "HMSET" "sess_8fdjpoeco2panshj38m7d6cd36" "pid" "vwelive|30576" "lock" "1"
+1434705128.835939 [0 127.0.0.1:58060] "EXPIRE" "sess_8fdjpoeco2panshj38m7d6cd36" "1440"
+1434705129.201090 [0 127.0.0.1:58060] "HGET" "sess_8fdjpoeco2panshj38m7d6cd36" "pid"
+1434705129.201434 [0 127.0.0.1:58060] "SELECT" "0"
+1434705129.201469 [0 127.0.0.1:58060] "HMSET" "sess_8fdjpoeco2panshj38m7d6cd36" "data" ":gz:x\x01\xedVKO\xdc0\x10\xe6\xa7D>A\xc5\xe6\x9dl\xe2\bU\x88C+Q(\x12\xb4\x1c-\x93\xcc\xb2\x86$\x0ev\xb2KK\xf7\xbfw\xecd\xd5\xe5\xd0\xaa\xc7=\xec%\x89\xc7\xf3\xf0|\xdf\x8c'\xa5T\xf0\x8b\xd3\x84\xbei\x1aF\x940\rZ\x0b\xd9\xb2\x15\xafE\xc5{\xa9\x18>9)8\x8d\x8dN\x10P\xa2\xa
QUIT
+OK
Connection closed by foreign host.
Install and configure redis Magento CE full page cache Lesti_Fpc
Lesti_Fpc is a Magento CE module developed by Gordon Lesti that enables an internal full page cache. A full page cache is included with Magento Enterprise but for CE users this is perhaps one of the best free full page cache solutions available.
If you are trying to optimising your Magento CE installation a full page cache will instantly improve page loading time and responsiveness. You will want to thoroughly test this module on your development servers to make sure it works with your particular Magento installation and frontend theme. You should read the support information from Gordon Lesti to familiarise yourself with the way the module works and can be configured.
I was not 100% comfortable with using the module and opted to modify it to only cache pages for users not logged in as I was mainly concerned about improving responsiveness for first time visitors and Google Search / Speed Index.
Like the default Magento system and session caches Lesti_Fpc will use the file system as the default cache storage system but we can also configure it to use redis. The Lesti_Fpc full page cache is one of the main reason I moved from using memcache to redis, Lesti_Fpc can use both, but only with redis can you refresh the full page cache within Magento. With memcache the only way to refresh the cache is to purge the cache storage.
Install Lesti_Fpc with modman
From your Magento root folder, use modman to install the Lesti_Fpc module.
modman clone https://github.com/GordonLesti/Lesti_Fpc.git
Refresh your Magento configuration and you will see a new cache type listed in the Magento cache storage management admin page.

To enable Lest_Fpc select the Fpc cache type and then select enable from actions and click submit. This will enable the full page cache which will start caching to the file system in var/cache/.
Configure Lesti_Fpc redis full page cache
To configure Lesti_Fpc to use redis as the cache storage system locate the fpc.xml.sample symlink in app/etc/. Rename the symlink to fpc.xml and open the file for editing. You will see an example redis cache configuration commented out, uncomment the configuration and edit the port settings to match the port configured on our redis instance 3 for full page cache – 6381. Note how Lest_Fpc also uses Cm_Cache_Backend_Redis to cache data to redis. Neat huh?
            <!--backend>Cm_Cache_Backend_Redis</backend>
            <backend_options>
                <server>127.0.0.1</server>
                <port>6381</port>
                <persistent>cache-fpc</persistent>
                <database>1</database>
                <password></password>
                <force_standalone>1</force_standalone>
                <connect_retries>1</connect_retries>
                	<lifetimelimit>86400</lifetimelimit>
                <read_timeout>10</read_timeout>
                <compress_data>1</compress_data>
                <compress_tags>1</compress_tags>
                <compress_data>gzip</compress_data>
            </backend_options-->
Refresh the Magento configuration cache to enable the redis cache for Lest_Fpc full page cache data.
Monitor Lesti_Fpc full page cache
Again we can confirm that Lest_Fpc is using redis by monitoring our redis instance on port 6381.
telnet localhost 6381
Trying 127.0.0.1...
Connected to localhost.localdomain.
Escape character is '^]'.
MONITOR
+OK
+1434708527.473899 [0 127.0.0.1:37524] "select" "0"
+1434708528.667508 [0 127.0.0.1:37538] "select" "0"
+1434708528.728683 [0 127.0.0.1:37538] "hget" "zc:k:cc4_487CA86953D34994D28E9FEA5DCAD22EF836ECD4_PAGE" "d"
+1434708535.892402 [0 127.0.0.1:37508] "select" "0"
+1434708542.685102 [0 127.0.0.1:37478] "select" "0"
+1434708542.772018 [0 127.0.0.1:37478] "hget" "zc:k:cc4_E8F535AA519A6B32EFBB322BAFB4BA86704430AB_PAGE" "d"
+1434708543.253530 [0 127.0.0.1:37495] "select" "0"
+1434708546.151371 [0 127.0.0.1:37562] "select" "0"
+1434708546.304141 [0 127.0.0.1:37562] "hget" "zc:k:cc4_3FA4328F459A7D31B2D5B7BD4C4374494AFF146E_PAGE" "d"
QUIT
+OK
Connection closed by foreign host.
You can now also delete the contents of your Magento var/cache/ folder, Magento is no longer caching data to the file system, and when all the caching modules are working correctly this folder will stay empty.
Congratulations you now have a fully cached Magento system using a fast input/output redis memory cache.
Monitoring redis
There are two admin tools well worth installing to help you monitor redis,
Steve Robbins has developed a Magento Redis Manager module that allows you to monitor your redis confguration via a Magento admin page.
Install Magento Redis Manager
Install the Magento Redis Manager module from your Magento root folder with modman.
modman clone https://github.com/steverobbins/Magento-Redismanager.git
Refresh your Magento configuration cache, log out of admin and back in to view the Magento Redis Manager admin page under System -> Redis Management.
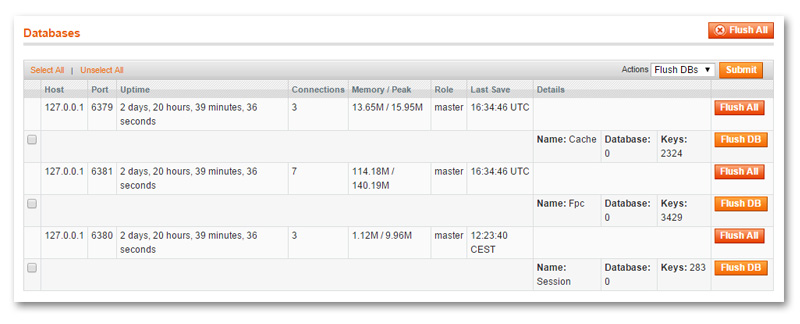
Here we can clearly see our three redis cache instances and how they are being used by Magento for the System (cache), Fpc and Session cache. Here you can also manually flush individual redis caches if required. You can also completely flush the cache storage from the cache management page.
Another redis administration graphical tool that is very useful is Erik Dubbelboers phpRedisAdmin. This is a php script that lets you monitor redis via your browser.
Install phpRedisAdmin
You can install phpRedisAdmin with composer, see the github page for more information.

You need to configure phpRedisAdmin with the names and port numbers of your configured redis instances, then you will see the three instances listed in phpRedisAdmin. phpRedisAdmin also lets you browse the redis data for each cache instance. Note that the last save values above show that the system and fpc caches are not being persisted, or dumped to disk by redis, the volatile session data however is persisted, and regularly saved to disk just as we configured it to.
Conclusions
Thanks to the developers of the Magento CE caching modules and redis cache storage system we have a pretty good method of optimising and improving Magento responsiveness with a cost effective fast caching system. Of course redis configured on a single server will have it’s limits, but for a small to medium sized ecommerce shop this solution should suffice and you should be able to implement a good caching system and experience good results from caching your Magento data.
You can see this cache system using the config from this blog running on my dev Magento 1.9.x store.
Credits
- Colin Mollenhour
- modman
- backend and session modules
- Gordon Lesti
- Lesti full page cache
- Steve Robbins
- Magento Redis Manager
- Erik Dubbelboer
- PHP Redis Admin
Hi, great post. Thanks a lot.
We were able to navigate all steps, except the configuration of phpRedisAdmin to show the three working instances.
Which file exactly in phpRedisAdmin do we have to modify and what is to be modified so that we can get the three instances of redis servers visible.
Lookforward to your reply. Thanks
You modify the default phpRedisAdmin view by editing the phpRedisAdmin config file at ./phpRedisAdmin/includes/config.inc.php
Great article. And thanks for the shoutout!
Hi there.. am about to embark on optimising my server and magento store. And one of the to-do list is getting redis up and running and would be using your walk-through as guide closely! Thanking in advance for writing such a great post!
I was about to get php redis installed to play a part for php session. i do not see it being part of your set-up.. is it a redundant step if we were to to use Cm_redis session?
Question: current stable redis version is 3.0.x ,so you think it is better to install through its source binary or apt? what do u think? redis server via apt wold take quite awhile to reach the source version..
Cheers!
You certainly need Cm_redis_session for magento session data. Unless there is a specific feature you want from the latest release version of redis I would go with the packaged version for your unix distro.
Yup.. Got it. Thank you!
Have managed to setup multiple instance/server for the redis.. Though Lesti FPC will have to wait after i have installed the new theme to see if both played nice.
Any tips on how best to maintain (using cron) the data/sessions size files..? Do you think we need to run the Garbage Collection Script as per Colin’s?
Hello,
Just thought I would let people know that this guide works well. I have followed this guide and have been able to achieve under 1 second full page load time and under 120ms TTFB on Magento 1.9.2.2 with 300,000 products. Hosting within our own cloud – quad core virtual machine with 30k iops ssd and 8gb ram.
I have also optimised MySQL and CentOS operating system.
Richard Leishman